I have finished my quilt with the ribbon border. Therefore I now have instructions on how to assemble the ribbon border after you have made the pieces shown in my previous post. Something I need to address in this border is the amount of pieces and direction of the pieces matter. In this quilt the top border is 23 QST wide and 29 QST long with 4 corners. This made a 2 inch deep 50 inch wide by 60 inch long border. This allowed me to add the corner shapes in so that they lined up. It is important to note that the QST on the top border are doing the opposite direction as the side borders and you have to cut them like that.

For the corners I put two 2 1/2 inch squares face sides together sewed the diagonal and timed excess and ironed open. to make a complete 2 1/2 inch square I used the background yellow and the red on this side to match the ribbon. To make this ribbon so that it looks correctly the only way to be positive it will work is to lay it out on the floor around the quilt top. If the ending parts end with the pink going downward to me it ruined the ribbon look and just looked off.
To ensure my ribbon looked as realistic as possible first i made enough for the top border and part of a side (making the QST in the same direction). I found there was no way to have all sides matching that way. The original pattern had even amount of QST on the sides and odd across the top and bottom. I found the only way to make this pattern work is by making either all sides odd or all sides even. Luckily they are small enough and has some many seams I was simply able to stretch them a little to fit and pinned like crazy. This kept everything fitting and looking nice.

Now depending on how your ribbons end you will need to change ribbon directions. Luckily this is easy to do using my method all you do is line up an already cut piece to your fabric the direction you want it to go and make sure you cut the 45 there. Another way to do this is if you made your first cut the way shown here to get your next QST of the opposite direction start cutting your 45 degrees across yellow fabric first instead of the light pink fabric shown in the picture. This will mirror the yellow and light pink fabric.

Here is an example of how the fabrics are mirrored as you can see there is no way to make the top block look like the bottom one. To get the ends the way you want them I would suggest making a few of each direction and with each background on it and just play with it on the floor until you get the look you want.
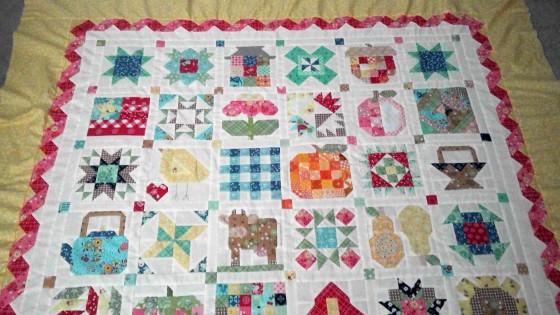
As a final note I would like it if you looked at my full quilt top as it is.

Notice something?
If you notice the yellow outer border does not lay flat it wrinkles. Why? Because when I sewed the outer border I was in a rush and did not pin. It is very important when you sew this border to the inner and outer borders you pin about every 4 inches. Because of how the ribbon border is cut and the thickness of it you have to sew very slowly and pin like crazy. I pinned the inner border to the ribbon to make sure it fit that sits flat I did not pin the outer border. Now I have to get out my seam ripper and resew the outer yellow border on to make it lay flat. Don’t be like me always pin your borders. I hate pinning but ripping is so much worse. YOU HAVE BEEN WARNED.
Good luck and if you make this border Please show me a picture I want to see how it turns out. Also if anything I said isn’t perfectly clear please look at this site ribbon border simple instructions and QST Quickly youtube video they helped me get started. Note in the youtube video you don’t have to buy anything she goes over how to make the 2 1/2 inch squares and she adds more than one row at a time but I found if you make more than one strip at once it just isn’t accurate enough and you are likely to waste a good amount of fabric. Neither of these show you how to match up your borders or how to have two background colors so I made this tutorial because I feel like knowing how to assemble them is very important!
In case you missed it here is Ribbon tutorial part 1

Pingback: How to make a folded ribbon border | Hello Gorgeous. How are you?